
The moment I received this image in a private Teams chat, I knew it would be a challenge… Not the dance. The migration 🙁
The product depended on a stable Elasticsearch cluster. Uptime had to remain at 100%, and no data could be lost. If the deployment failed, a single misclick could jeopardize the 99.99% SLA commitments we had signed with our partners.
Manually repopulating the data – 26 million records – would have taken an enormous amount of time. Twelve or thirteen hours, perhaps even longer.
The pressure was high. Fortunately, thanks to thorough preparation, detailed documentation, and extensive testing in environments that closely mirrored production, I completed the migration with only 30 seconds of downtime.
Could I have achieved zero downtime? Yes. However, doing so would have increased the risk of data loss. Given the trade-off, 30 seconds of downtime was an acceptable and responsible decision.
Migration Assistant for OpenSearch
I found a great tool that could handle the migration. It promised near-zero downtime and supported migrations from Elasticsearch 6.8 to OpenSearch 3.5. The tool was well documented, and the team behind it had even created a series of video tutorials explaining how to use it. Most importantly, deployment was automated via Cloudformation.At the time of writing, the creators of the tool recommend using EKS (Kubernetes) as the preferred migration platform. ECS way is expected to be deprecated soon. However, I used ECS anyway, as I didn’t have time to experiment with EKS. EKS way was not an option when I found the tool. For reference, I have included all the documentation and resources that I used throughout the migration process.
- AWS Documentation and how to deploy the tool in AWS – here
- Tool official documentation – here
- Git repo – here
- youtube video How to deploy the solution
- youtube video RFS for backfill process
- youtube video for Capture and replay process
How it works
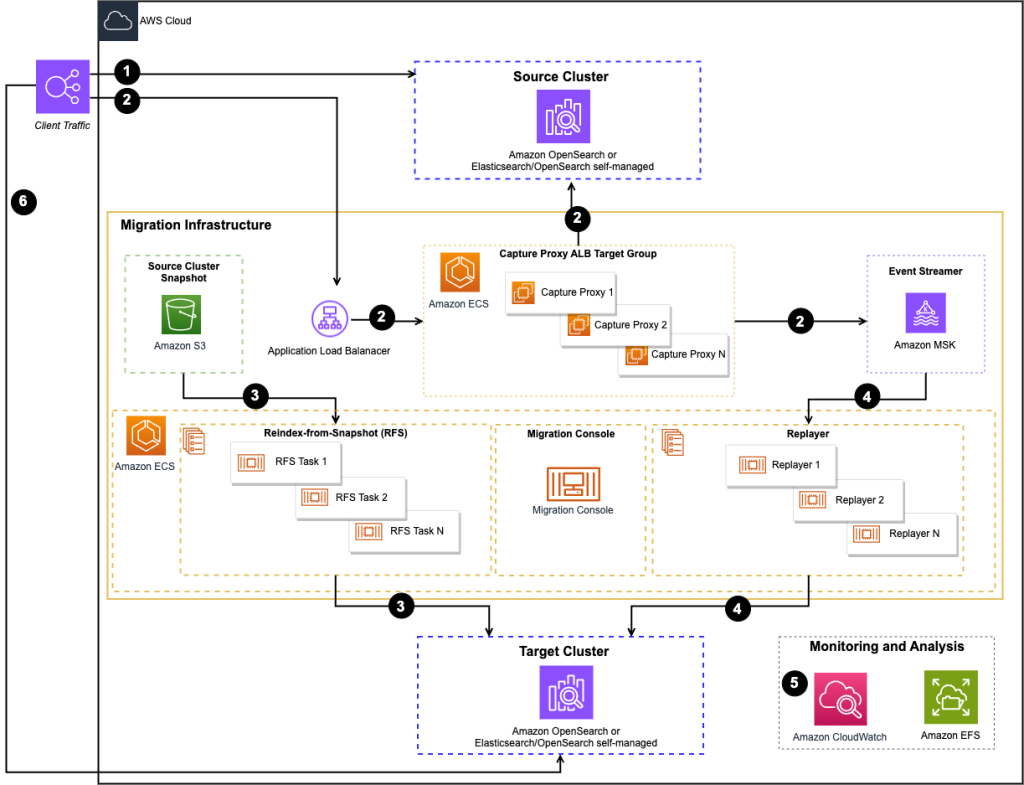
Copied from aws documentation. It is described perfectly.
Migration Assistant 3.0 deploys to Amazon Elastic Kubernetes Service (in my case it was ECS). The solution has two layers:
- A control plane that manages migration workflows. It includes the Migration Console pod, the Workflow CLI, and the Argo Workflows engine that sequences tasks, retries failures, and tracks state.
- A data plane that performs the actual snapshot, metadata, backfill, capture, and replay work. It includes Reindex-from-Snapshot (RFS) workers, the Capture Proxy, the Traffic Replayer, and Strimzi-managed Apache Kafka for capture and replay.
The high-level process flow for the solution components deployed with the AWS CloudFormation template is as follows:
- Client traffic is directed to the existing source cluster. For zero-downtime migrations, a Kubernetes Service backed by an Application Load Balancer or Network Load Balancer routes traffic through the capture proxy fleet, which forwards requests to the source while simultaneously recording them. For backfill-only migrations, this step is skipped.
- The capture proxy replicates traffic to Apache Kafka. The capture proxy relays traffic to the source cluster and simultaneously replicates the raw request/response streams to Apache Kafka, managed by Strimzi on Amazon EKS. This provides a durable record of all writes during the migration window.
- Snapshot and backfill via Reindex-from-Snapshot. With continuous traffic capture in place (or after pausing writes), the user submits a migration workflow from the Migration Console using the Workflow CLI. The workflow creates a point-in-time snapshot of the source cluster in Amazon Simple Storage Service (Amazon S3), migrates metadata (indexes, templates, aliases) to the Amazon OpenSearch Service domain or Amazon OpenSearch Serverless collection, and then launches RFS workers that read directly from the snapshot in Amazon S3 and bulk-index documents into the target.
- Traffic Replayer catches up the target. After the backfill completes, the Traffic Replayer reads captured traffic from Apache Kafka and replays it against the Amazon OpenSearch Service domain or Amazon OpenSearch Serverless collection, transforming requests as needed (authentication, index names). The replayer catches the target up to real-time, closing the gap between the snapshot point-in-time and the current state.
- Validate and compare. The performance and behavior of traffic routed to the source and target clusters are analyzed by reviewing logs, metrics, and document counts in Amazon CloudWatch, and by running comparison queries from the Migration Console.
- Redirect traffic and decommission. After confirming the target cluster’s functionality meets expectations, the user redirects clients to the new Amazon OpenSearch Service domain or Amazon OpenSearch Serverless collection by updating DNS records, load balancer configuration, or application connection strings. The user keeps the source cluster available as a fallback during a rollback window, then decommissions the source and removes Migration Assistant infrastructure.
How to deploy the solutions
This is my notes for tool deployment. I have only Ubuntu Linux machine and IAM user. I need to “bootstrap” the AWS account in order to use AWS Cloud Development Kit (AWS CDK). CDK will update Cloudformation sets and create resources.
- Install nodejs: https://nodejs.org/en/download/
- Install AWS CDK CLI https://docs.aws.amazon.com/cdk/v2/guide/getting-started.html
npm install -g aws-cdk

cdk --version3. add this permissions to deployment user
{
    "Version": "2012-10-17",
    "Statement": [
        {
            "Effect": "Allow",
            "Action": [
                "cloudformation:*",
                "ecr:*",
                "ssm:*",
                "s3:*",
                "iam:*"
            ],
            "Resource": "*"
        }
    ]
}4. Install aws cli. Use the IAM credentials after aws configure
cd /tmp
sudo apt update
sudo apt install unzip curl -y
curl "https://awscli.amazonaws.com/awscli-exe-linux-x86_64.zip" -o "awscliv2.zip"
unzip awscliv2.zip
sudo ./aws/install
aws --version
aws configure5. Bootstrap the account. Watch in real time in cloudfromation after typing the command. Replace 111111111111 with your account ID and your region.
cdk bootstrap aws://111111111111/eu-central-16. Do not forget to remove permissions from deployment user after bootstrating the account. You will no longer need it.
Create new OpenSearch Cluster
ElasticSearch cluster 6.8 will be named source. This is the old cluster that needs to be migrated.
OpenSearch cluster 3.5 will be named target. This is the new cluster that will be filled with data. Place Opensearch in the same subnets, same VPC, same security groups. This garantie no network issues. My source cluster was protected only by firewall, without authentication. My new cluster will use username and password. Migration tool with get the credentials from secrets manager.
Create new secret in secrets manager with type:other. Use this for Key/value. Save secret arn for later
{"username":"YourOpenSearchUsername","password":"YourOpenSearchPassword"}Deploy Migration Assistant for Amazon OpenSearch
- From here Launch Migration Assistant with ECS in an existing VPC. This will start ec2 instance.
- Choose your Region from top right cornet in AWS. By default it will use US Region
- Specify stack details. It is very important to choose cdek-hnb6. If you not do it expect authentication 401 errors.
Stack name name : MAFAOS-stack-name-v1
--Parameters
subnet-0111114ee1baa1c1 / your subnet
subnet-22a22aa2222a22222 / your subnet

Stage: prod1
on second page click: Preserve successfully provisioned resources ||
and choose IAM role - optional cdek-hnb6... ||4 Connect to the new ec2 instance that was just created. It will be named bootstrap-instance-bla-bla. Use SSM Session manager
sudo su root
bash /opensearch-migrations/initBootstrap.sh
cd /opensearch-migrations/deployment/cdk/opensearch-service-migration
vim cdk.context.json Now I will change default configuration of the tools, according to my needs which are:
- ElasticSearch without authentication
- Opensearch 3.5 with authentication. check userSecretArn
- “reindexFromSnapshotExtraArgs”: “–index-allowlist transactions –documents-size-per-bulk-request 5242880” You will need this if your cluster has low resouces.
- “captureProxyExtraArgs”: “–suppressCaptureForHeaderMatch user-agent .ELB-HealthChecker.” This never worked. Kafka continue to capture healthchecks. I found a work around, which will be revealed later in the article.
- “trafficReplayerExtraArgs”: “–speedup-factor 3 Play with this according to your needs. 3 worked for me. This is how fast Kafka will post new data to target cluster.
- –transformer-config-file /shared-logs-output/transformation.json” Very, Very Very important file. In this file later we will place transformation json. It servers to transform in real time records arriving target cluster. Check this for more info. Elasticsearch 6.8 still supports mapping types (e.g., _doc, my_type, logs), but OpenSearch 2.19 (like ES 7+) removed mapping types. The migration tool needs a transformation config to handle this
check your mappings with this command
curl -s 'https://mysource-cluster.eu-central-1.es.amazonaws.com/_mappings?prettyIn my case it was someting like elasticsearchcluster/cats/cats and I needed to transform in in opensearchcluster/_doc/cats. Refill from snapshot transforms it in _doc/cats format
5. vim vim cdk.context.json
{
  "default": {
    "stage": "prod1",
    "targetCluster": {
      "endpoint": "Paste OpenSearch 3.5 URL. This is the cluster we put info in",
      "// allow_insecure documentation": "Set this to true to ignore when the target cluster's HTTP certificate was not signed with a trusted CA Root Certificate.  Default: true",
      "allow_insecure": true,
      "auth": {
        "type": "basic",
        "// basic auth documentation": "The next line is relevant for basic auth only",
        "userSecretArn": "paste ARN from secrets manager created early"
      }
    },
    "sourceCluster": {
      "endpoint": "ElasticSearch 6.8 URL. This is the cluster that we take info from",
      "// allow_insecure documentation": "Set this to true to ignore when the source cluster's HTTP certificate was not signed with a trusted CA Root Certificate.  Default: true",
      "allow_insecure": true,
      "version": "ES_6.8",
      "auth": {
        "type": "sigv4",
"region": "PUT your region here",
"serviceSigningName": "es"
      }
    },
    "MskEbsStorage":{
      "maxCapacity": 16384
    },
    "vpcId": "paste your VPC HERE",
    "// help vpcAZCount": "For deployments using the capture-proxy, this AZ count should match the source cluster AZ count.",
    "vpcAZCount": 2,

    "reindexFromSnapshotServiceEnabled": true,
    "// reindexFromSnapshotExtraArgs": "--index-allowlist transactions --doc-transformer-config-file /shared-logs-output/transformation.json",
    "// reindexFromSnapshotExtraArgs": "--index-allowlist transactions",
    "reindexFromSnapshotExtraArgs": "--index-allowlist transactions --documents-size-per-bulk-request 5242880",
    "reindexFromSnapshotMaxShardSizeGiB": 80,

    "// settingsForCaptureAndReplay": "Enable the following services for live traffic capture and replay:",
    "trafficReplayerServiceEnabled": true,
    "managedServiceSourceSnapshotEnabled": true,
    "captureProxyServiceEnabled": true,
    "captureProxyExtraArgs": "--suppressCaptureForHeaderMatch user-agent .*ELB-HealthChecker.*",
    "targetClusterProxyServiceEnabled": true,

    "// help capture/target proxy pt. 1 of 2": "captureProxyService and targetClusterProxyService deployment will fail without network access to clusters.",
    "// help capture/target proxy pt. 2 of 2": "In most cases, keep the desired count setting at `0` until you verify connectivity in the migration console. After verifying connectivity, you can redeploy with ahigher desired count.",
    "captureProxyDesiredCount": 3,
    "targetClusterProxyDesiredCount": 3,

    "// help trafficReplayerExtraArgs": "Increase the speedup factor to replay requests at a faster rate in order to catch up.",
    "trafficReplayerExtraArgs": "--speedup-factor 3 --transformer-config-file /shared-logs-output/transformation.json"
  }
}
6. Deploy the solution. It will take take. Check cloudformation for errors.
cdk deploy "*" --c contextId=default --require-approval never --concurrency 57. Login to ECS instance. This is just ECS container. We use it to for creating snapshots, check clusters connection, migrate data. In simple words, We control everything from this migration console
./accessContainer.sh migration-console prod1 eu-central-18. Check if migration tool can access both clusters
console clusters connection-check9. Check what clusters are saying. Take your URL from migration tool load balancer
curl -k https://internal-MigrationAssistant-prod1-1111111111.eu-central-1.elb.amazonaws.com:9201
curl -k -u "YourOpenSearchUsername:YourOpenSearchPassword" https://internal-MigrationAssistant-prod1-1111111111.eu-central-1.elb.amazonaws.com:9202Point Application traffic to migration tool
I have migration tool ready. Now is time to point the application traffic to it. It will automatically mirror the traffic to source ElasticSearch and capture all traffic inside Kafka records. In this way I will not lose data. Migration tool load balancer does not provide valid ssl certificate. That’s why I needed to created A record in Route53 and add certificate to the load balancer on 443 listener. My app was pointing to URL like : https://migration-assistant.myapp.com with valid certificate, not https://internal-MigrationAssistant-prod1-1111111111.eu-central-1.elb.amazonaws.com.
Final check before switching traffic. If this curl gives some valid info, everything is fine. 26560812 is valid record. cat/cat is my existing mappings. Find yours:)
curl -s \
'https://migration-assistant.myapp.com:443/cats/cats/26560812?pretty'Create snapshot part a.k.a backfill proccess
Documentation for the process here.
# 1. show cluster indices
console clusters cat-indices

# 2. start snapshot
console snapshot create

# 3. check snapshot Stack
console snapshot status
console snapshot status --deep-check

# 4. prepare to migrate only dogs indices metadata
console metadata evaluate --index-allowlist cats --component-template-allowlist none --index-template-allowlist none

# 5. migrate
console metadata migrate --index-allowlist dogs --component-template-allowlist none --index-template-allowlist none

# 6. check if indeces are migrated
console clusters cat-indices

# 7. after migration is done
console backfill stopIf you see this :”Message”: “Request size exceeded 10485760 bytes”
Why it is happening
The RFS worker default –documents-size-per-bulk-request is 10 MiB, but this only counts the document payload
Option 1: Reduce Bulk Request Size (Quick Fix)
Add –documents-size-per-bulk-request to your cdk.context.json:
{
“reindexFromSnapshotExtraArgs”: “–documents-size-per-bulk-request 5242880”
}
Check what was migrated inside target cluster. Execute from migration-console
TARGET="https://your opensearch urlm"
AUTH="username:password"

curl -sk -u "$AUTH" "$TARGET/dogs/_doc/1234?pretty"Capture and replay
Create this file on migration console /shared-logs-output/transformation.json . This is the very very import transformation file I talked about in cdk.context.json. You will need to implemet it according to your needs. Good luck with that. It took me 2 week to figure it out for me.
[
  {
    "TypeMappingSanitizationTransformerProvider": {
      "staticMappings": {
        "transactions": {
          "cats": "cats"
        }
      },
      "sourceProperties": {
        "version": {
          "major": 6,
          "minor": 8
        }
      }
    }
  }
]I was talking about traffic replay which we will start now and health checks that are captured by kafka. Kafka capture a lot of health checks from ECS containers, which creates probles for replayer. It cannot replay thaffic in real time and target opensearch cluster is never on the same page as source. It is laggy. Thats why I will increase heath checks interval to 300 seconds, but only after replayer started and I can see that traffic is replayed successfully. Target Group you need to configure is : ALBSourceProxy-prod1-TG
My commands for capture and replay was
# 1. check kafka records
console kafka describe-topic-records

# 2. Start to migrate data. This will create new ecs task container named traffic-replayer-default:1
console replay start

# 3. If you need more traffic replay containers
console replay scale 5

# 4. check logs
cd /shared-logs-output/traffic-replayer-default

# 5. check data in both clusters. It will take time for replayer to migrate in real time. In my case it was 50 minutes
console clusters cat-indices --refresh

# check kafka records
6. console kafka describe-consumer-groupSwitch traffic
We can switch traffic to target cluster directly from migration tool or just by pointing our app to opensearch. I did it via migration tool. You can do it from Application load balancer on port 443. On target you will find: Weight 0 and 1. Switch it to 1 0. Stop the replayer
console replay stopUseful checking commands
## check data in both clusters
console clusters cat-indices --refresh

## check kafka records
console kafka describe-consumer-groupDanger commands
# delete everything on target cluster
console clusters clear-indices --cluster target

# delete kafka records
DELETE kafka records: console kafka delete-topic